Sunday, November 27, 2016

Holiday Photos? Make These Adorable Collars!

Now begins the season of taking holiday photos.  Some will take dogs (and cats!) to see Santa for pictures. Some will pose the family animals with the family humans of all ages and capture memories forever more.

Tulle collar.

These adorable collars are not hard to make, and you can be creative in your use of materials and colors to match your dog's personality and the occasion.  

Cut elastic into strips that will easily fit around your dog's neck without stretching.  Without stretching the elastic, the collar should fit close to your dog's neck but not tight.  Add an inch to that length and cut the strip that length.  The extra inch is to allow for you to tie the ends together easily to create a circle.  Cut off any loose ends after you tie it.  

Tulle cut into strips can make a fluffy, tutu-type collar.  How long you cut the strips will determine how fluffy the collar will be.  You can fold the tulle strip in half and hold it on the elastic collar to see how far it will stick out.  Adjust your tulle strips accordingly.


There are a couple ways to attach the tulle.  One is to simply tie the tulle to the elastic with knots.  I prefer to use slip knots.  To make a slip knot, fold each strip in half.  You will then have a folded end and two loose pieces at the other end.  The two loose ends go underneath the elastic collar strip and curl around the elastic, so you now have the elastic in the middle.  Then slip the two loose ends into the hole created by the folded end and pull the loose ends through until it tightens on the elastic.  (See photo below)  Don't pull too hard.  Just hard enough to have it tied around the elastic. Continue in this way until the entire collar has been filled.

Shown with ribbon because it's easier to see.

Ribbon collars are also pretty.  Choose several colors/styles of ribbon that you feel complement each other. Attach them in the same way as attaching the tulle above.  It's nice when you cut the ribbon strips to cut the ends of each strip at an angle.  It looks fancier and prevents a lot of unraveling.


Voila!  Super cute and easy collars!


Ribbon collar.


Sunday, November 20, 2016

Making and Using a Solid Leash

A solid leash can be helpful with a smaller blind deaf dog.  It allows you to have a way to give subtle leash cues at your dog's neck level, which are clearer to the dog than if they come from far above her.  It also will save your back from needing to bend over to give those cues or lead your dog around obstacles on a walk. Think of it as an extension of your arm to allow you to reach down lower.  

A solid leash can be useful during walks on busy sidewalks or in areas that you will need to steer your dog around obstacles or people, or when teaching certain training exercises when you want your dog to stay right next to your leg.  A solid leash will not be very useful on walks when you want to let your dog sniff around and explore.  A regular or long leash would work better for that.  

It will take some practice for you to learn how to handle the solid leash fluently.  There is less slack than with a regular leash, so your cues travel directly to your dog's neck.  You will need to use much less leash pressure - sometimes just a small adjustment of your hand or wrist will give a different cue to your dog. 

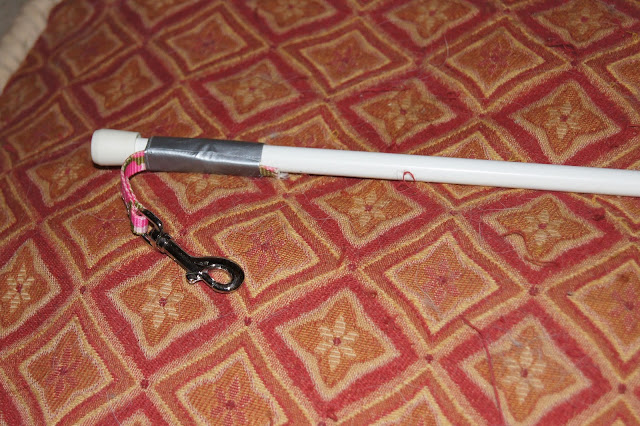
You can use a very simple and inexpensive version of a solid leash, or you can create a very elaborate one. The solid leash I use is a curtain rod that was the right length for me to hold easily in my hand and also reached down to my dog's neck level.  Getting one that is too long will be cumbersome to hold. Getting one that is too short will require bending over to hold it.

The curtain rod has a finished surface and has comfortable end caps on it.  It has a more finished look and feel than a wooden dowel rod, which would have worked just as well.  I cut up an old leash with a small clip that wouldn't be too heavy or clunky for my dog's neck.  I left a small tab of leash connected to the clip. This allows for a bit of flexibility between my dog and the rod.  I then used heavy tape to attach the tab of leash to the end of the curtain rod.  Voila!  This version works so well for us that we haven't seen a need to change it.

Notice there is a bit of leash between the rod and the clip


This leash is meant as a guide to help cue your dog around obstacles and people.  Please don't use it to pull or push your dog.  Take the time to teach your dog the cues and you will be amazed how easy it is to convey information to your dog through a gentle touch on the solid leash.  

You can use the same techniques for teaching regular leash walking to teach solid leash walking.  If your dog already knows gentle collar cues, it should be easy to review the steps with the solid leash.  But don't assume that the cues coming from the solid leash will feel the same to the dog as what she already knows.  Take some time to review and keep it a positive experience for both you and your dog.  

If you would like some help with the steps of teaching leash walking to a blind and deaf dog, here is a great article to help you:  Click here to go to the article.   The same steps in the article can be used to introduce the solid leash to your dog.  

The solid leash is not a tool that I use every day, but I have found it very helpful with Treasure, who is a small dog, in certain situations and for teaching certain behaviors.  I hope if you have a smaller dog, that you may find it helpful as well.  


Tuesday, November 8, 2016

Vinny's Trick Show

Wow!  Look who is joining the ranks of Novice Trick Dog!  Vinny earned his title certificate and ribbon!


Vinny 6 months old


This guy is just SO much fun to play with!  He learns just as fast as I can teach him and is always ready for more.  Enjoy Vinny's new tricks:


How Did You Get That Picture?

I'm often asked how I get such great pictures of my dogs, especially when I am taking a picture of all of them together in a group shot, like this one: 


There are a couple secrets I'll share with you.  

The first is that I teach a solid stay behavior to all of my dogs. I want them to be able to stay in any comfortable position when asked for as long as I need them to stay there.  It becomes my responsibility to be sure that I'm not asking my dogs to stay in a position or situation that is uncomfortable or unsafe for them.  
In the above picture, I know that the dogs that are up on top of the bales are comfortable with being on various surfaces and being up off the ground.  I also know they have great stays and are very unlikely to move.  This means I feel safe leaving them up on top of the bales while I move away to take pictures. 

The dog in the lower left is Vinny.  He is still a puppy and does not have a very solid stay yet.  When I took this picture, we had never worked on a stay in a brand new public place before, and he had never done a stay with me so far away from him or for so long.  Plus he was excited to be out with the other dogs and wanted to bounce around and play.  His leash is attached in case I needed to catch him quickly, but I tucked it behind him so it wouldn't show in the picture.  He did great because I took many breaks and went back to reward him for choosing to stay.  This made the photo shoot take longer, but left me and my dogs happier and helped Vinny be successful.

The dog in the lower right is Vegas.  He can't see very far away from him and he is deaf, so when I backed up to take the photo, he couldn't see me.  That meant he had no idea where I had gone.  I know that Vegas can get spooked and if I am not within his line of sight, he will bolt and run far and fast until I can catch up with him.  Vegas has a leash on and is tethered to the hay bale just in case.  He has a great stay, but I will not take a chance with my dogs' safety.  If you look closely, you can see his leash tethered, but it does not detract from the great picture.  

My second secret is to take a LOT of pictures!  I take way more pictures than I will need so that I'm able to go back and choose the best shots.  For this great picture, there were many others that I deleted with dogs looking this way or that way.  It is hard to get blind and deaf dogs to look at the camera on demand.  By taking lots of pictures from different angles, I then have lots of great pictures to choose from and can usually find one where they are looking in my direction at leash partially.  

I already alluded to the fact that I carry treats - I carry lots of toys and treats during my photo shoots.  I don't want my dogs to look bored in their pictures.  It has to be fun for them for me to get the great shots that I get.  The photos are for my enjoyment, so I do all I can to make the process for my dogs' enjoyment also.  I schedule plenty of time and take lots of breaks.  I know which of my dogs enjoy photo sessions and which ones get tired of them quickly.  I can choose which dog I photograph first and whether to do the group shot first thing or perhaps in the middle before certain dogs get tired.  

These are just a few of my favorites from out last photo session:  

Owen - paws up stay

Brinks - sit stay and wave paw

Treasure - sit stay

Vinny - sit stay with his own variation of sniffing the air for treats

Vegas - sit stay and his famous smile